You are using an out of date browser. It may not display this or other websites correctly.
You should upgrade or use an alternative browser.
You should upgrade or use an alternative browser.
Drill Pattern For Viking Paddles??
- Thread starter morinzo
- Start date

bonefisher
Well-Known Member
I think you measure just the button..so if you put the paddles on and measure inside dia. plus thickness of controller you should get what size you need button.
bonefisher
Well-Known Member


bonefisher
Well-Known Member
That's looking pretty good... might want to go a smidge up.. very little.
Last edited:

Yes, that is about how we do them. No exact science, just trial and error. When I do it I tighten it down, then back them off and try to have the best sounding/feeling "click" on both of them. Some people say that they change slightly over times, so if you find this to be true just adjust them to you liking again later.
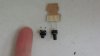
The washers should just slide onto the screw. There are two drillbits used to install the TACs; one is smaller than the screw and one is slightly larger than the TAC switch. When the screw is installed it widens the hole in the plastic just enough and wedges itself nicely into it. When playing the pressure from depressing the paddles is not on the screws very much, it is mostly on the TAC it self.
After selling this product for over a year we have had no customers open a ticket about the screws coming loose or falling out, but we have had a few people that have pushed the TAC inside their controller so it was rendered unusable (hence my suggestion to create score marks in the plastic around where they sit on the inside to give the glue something extra to hold onto) If you are really worried about it you could put a little dab of hot glue on top of where the screws come through, but do not score that area because you could make the hole too large for the screw to fit snugly and properly.
After selling this product for over a year we have had no customers open a ticket about the screws coming loose or falling out, but we have had a few people that have pushed the TAC inside their controller so it was rendered unusable (hence my suggestion to create score marks in the plastic around where they sit on the inside to give the glue something extra to hold onto) If you are really worried about it you could put a little dab of hot glue on top of where the screws come through, but do not score that area because you could make the hole too large for the screw to fit snugly and properly.
Thank you for all you advice I have followed most of what you said.
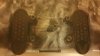
Here is how I made my paddles work with the stereo adapter:
First I used dbl sided tape the on the razors from. my knife then attached them to the stereo adapter.

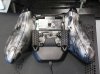
Then I attached the paddles to the controller & heated them with my heat gun and pressed the stereo adapter into the controller and held it till it cooled.

This is what it looked like after It cooled and I pulled the stereo adapter out.

Above pic of the paddles after heating.

You guys could do something similar so the Berserker could work with the stereo adapters if you wanted to, it works & feels just as good as it did before bending.
Here is how I made my paddles work with the stereo adapter:
First I used dbl sided tape the on the razors from. my knife then attached them to the stereo adapter.
Then I attached the paddles to the controller & heated them with my heat gun and pressed the stereo adapter into the controller and held it till it cooled.
This is what it looked like after It cooled and I pulled the stereo adapter out.
Above pic of the paddles after heating.
You guys could do something similar so the Berserker could work with the stereo adapters if you wanted to, it works & feels just as good as it did before bending.
Last edited:
modded matt
Active Member
As noted, the screws screw directly to the plastic shell and hold quite well (surprisingly) this is the same method used by Scuff. the washers provide spacing and the flexibility needed when pressing the paddles.
Placement of the tacts is critical because, if they are too low on the controller, the MOBO wont sit down into the shell enough to line up the mic input port. If the tacts are too high, they will interfere with the clips on the battery cover when they are inserted.
If all that is needed to be able to use the chat adapter is clearance between the paddle and the adapter, how about using a taller tact and and additional rubber washer to gain the clearance needed. you may also need longer screws.... but hey, happy modding.
Edit: and if that works, you can change the paddle screw/washer configuration then thicken just the portion of the paddle that contacts the tact to make up the difference. this way it is all done externally which should not void the warranty on the controller.